How to Use ALULA (web version)
Taking a lesson
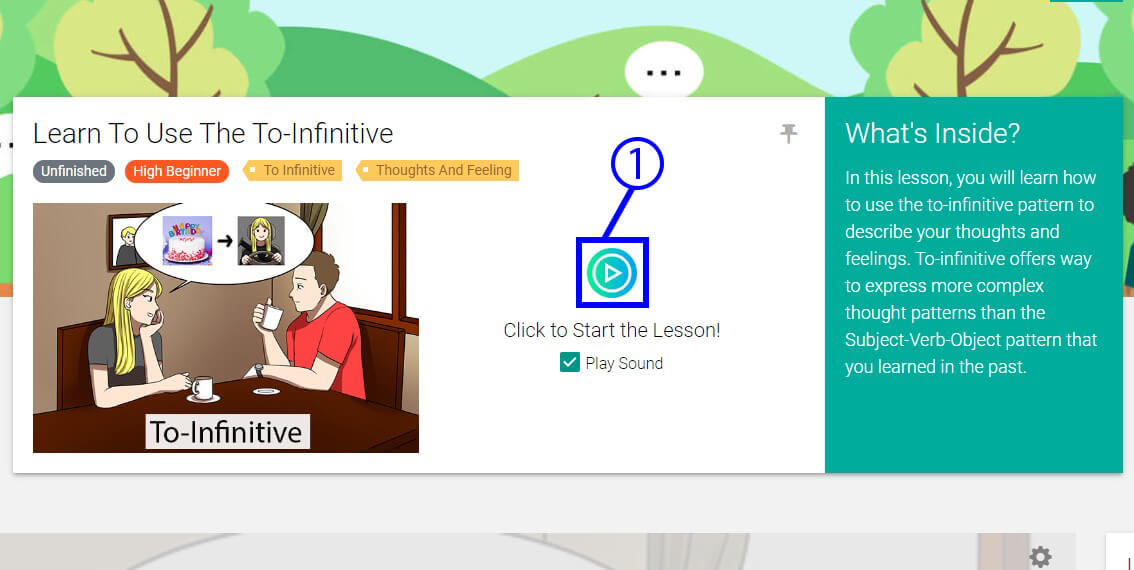
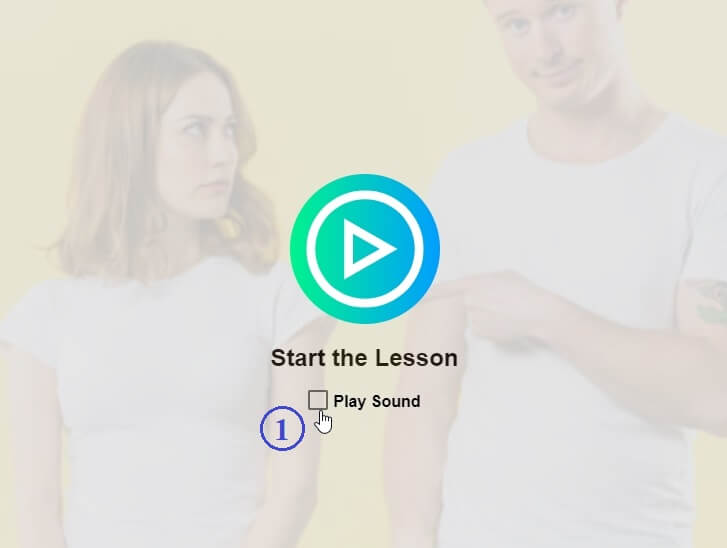
Start a desired lesson by clicking on the 1Start the Lesson button. After the introduction, your Virtual English Tutor will talk to you.
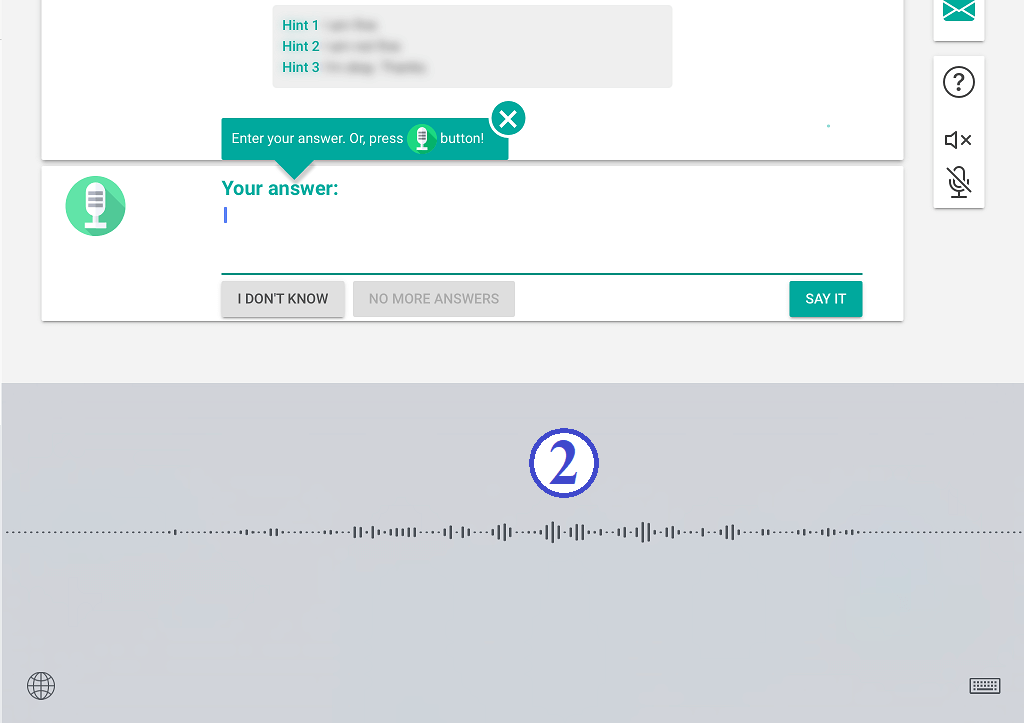
Listen carefully to the tutor. When the tutor asks you a question, either type in your answer into the 1answer area or 2say your answer aloud. If you type your answer into the answer area, click on 3SAY IT button to send your answer to the tutor.
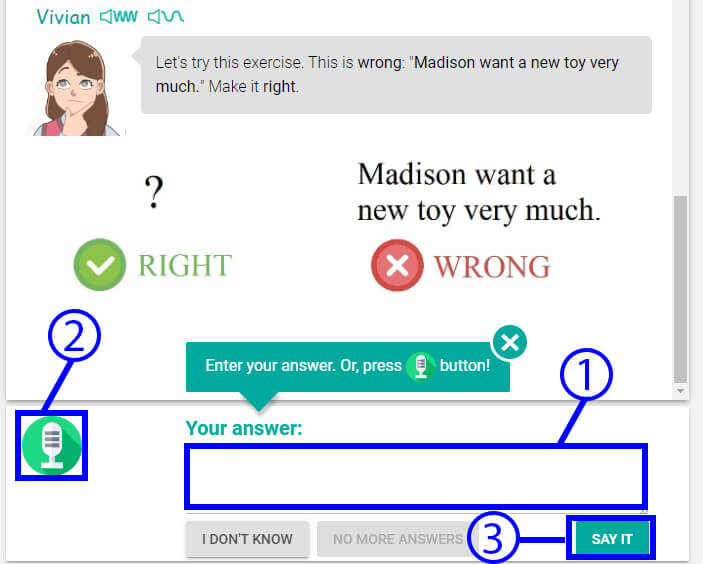
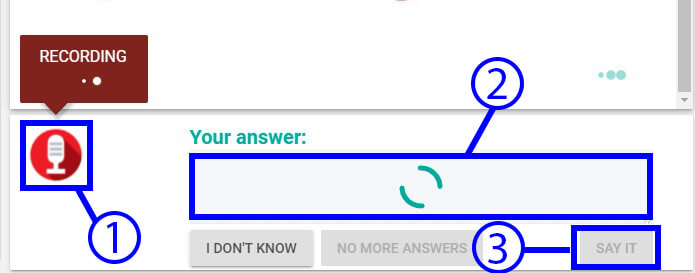
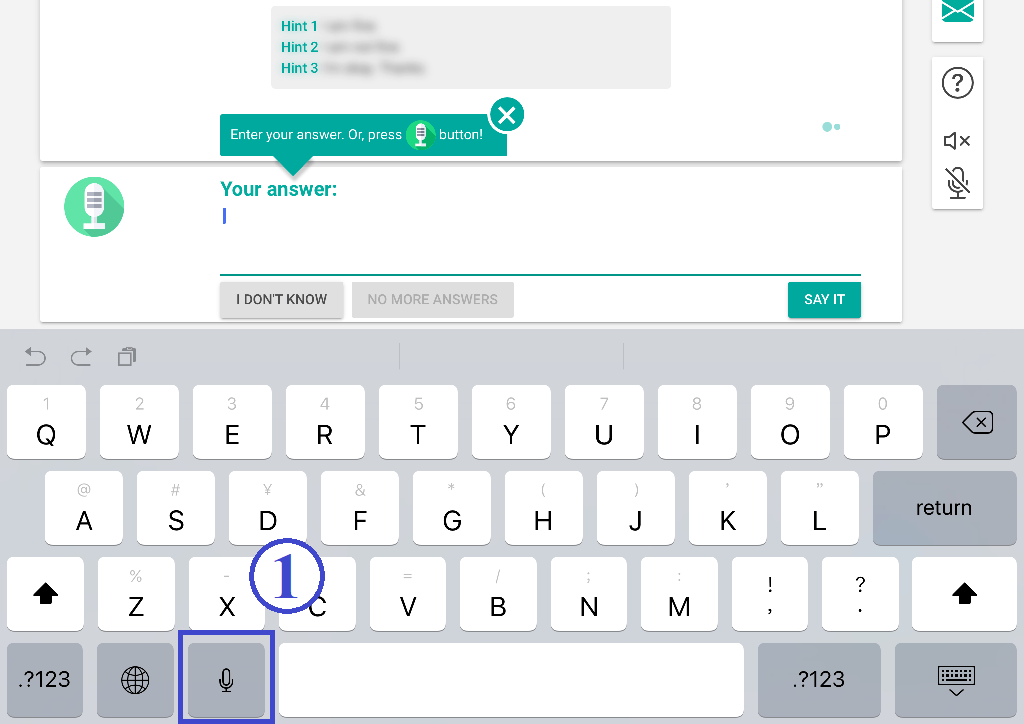
To say your answer aloud, press down on the green 1microphone button and speak into your microphone. After speaking, release the button. Your speech will appear in the 2answer area. You can click on 3SAY IT button to send your answer to the tutor. Or, press down on the 1microphone button to say it again.
The 1whiteboard shows the lesson material. You can view the whiteboard as a reference when you are answering a question.

Listening to the tutor talk
Turn on the speaker on your computer or device. Make sure that it is working.
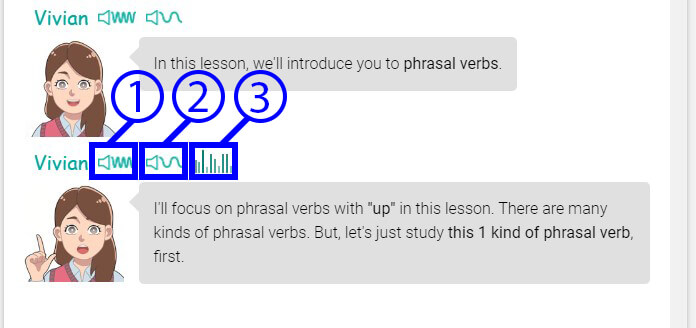
When the tutor is speaking, you will see 1a sound icon beside the tutor. If you don't hear the sound, your speaker might not be working properly. Check your device setting and make sure that the speaker is turned on and volume setting is not too low.
If you want to hear the tutor one more time, click on the 2regular speed icon or the 3slow-speaking icon.
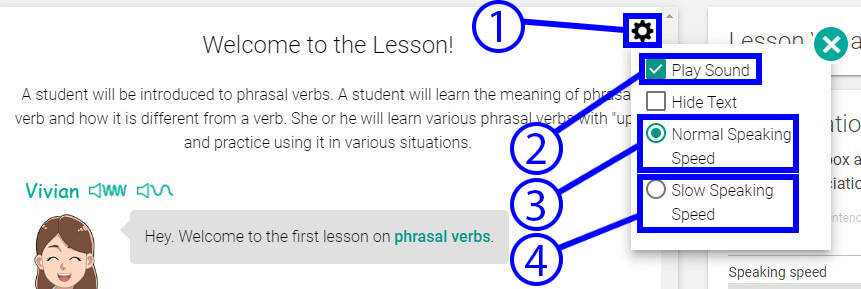
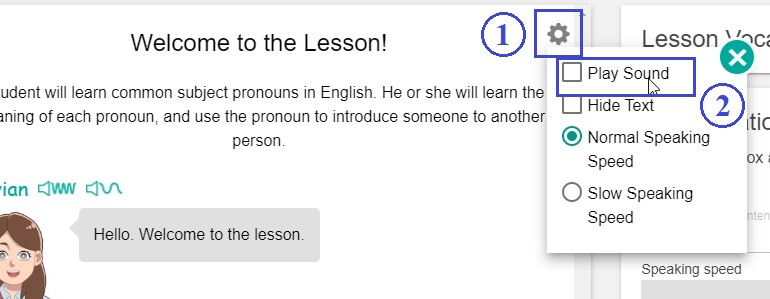
If you don't see the sound icon, the Play Sound option may be turned off. Click on the 1Setting Icon, and check the 2Play Sound option. You can also set the speaking speed by checking either the 3Normal speaking speed or the 4Slow speaking speed.
Allowing your browser to play sound
Sometimes, you may need to allow your browser to play sounds. Please follow the instruction for your browser.
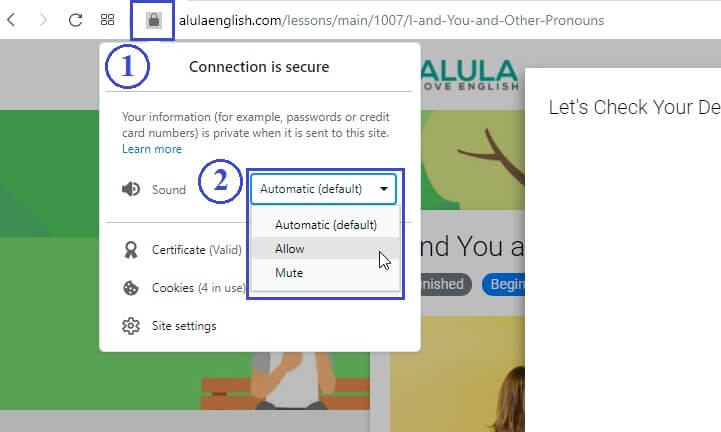
![]() Google Chrome
Google Chrome
Short Method:
Click on the 1green icon on the browser bar. Then, click on the 2Sound Dropdown and select 3Allow.

Long Method:
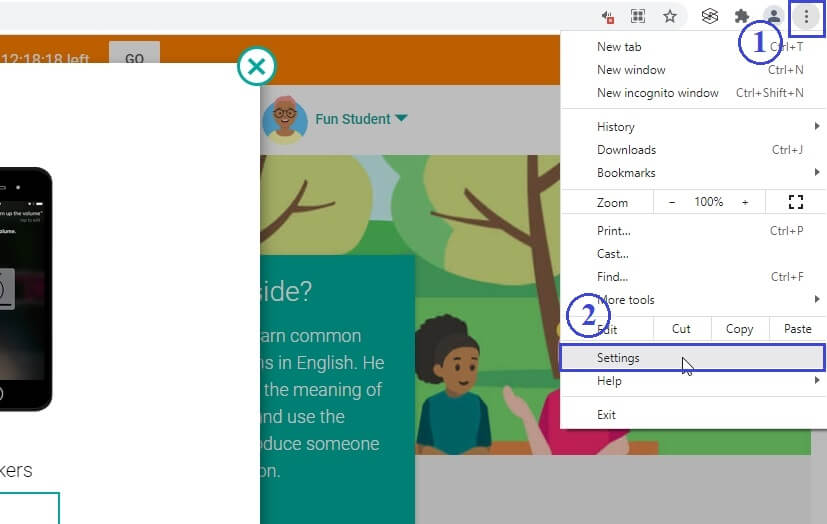
Click on the 1setting icon on the browser bar. Then, click on the 2Settings menu.
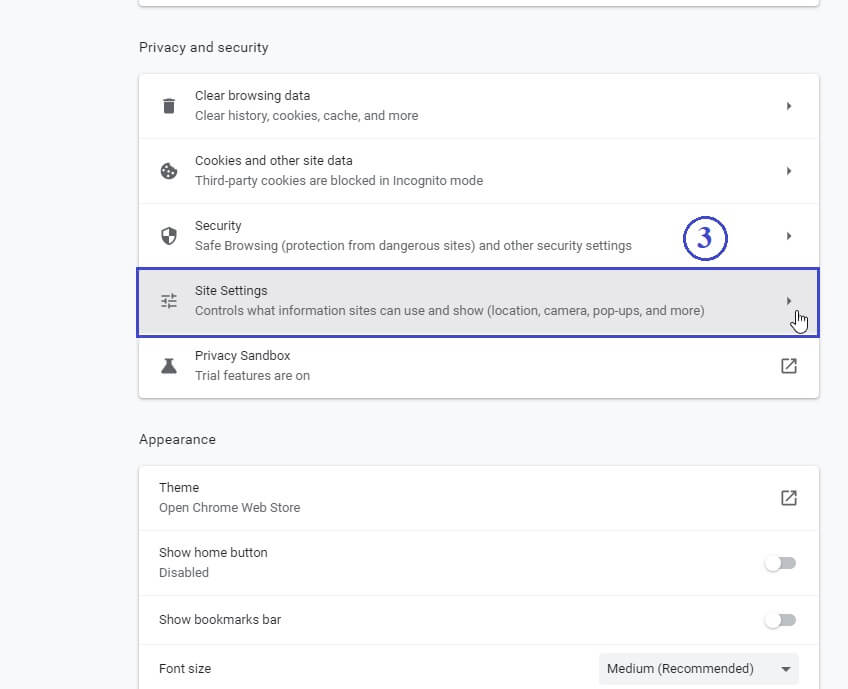
Click on the 3Site Settings menu under Privacy and security.

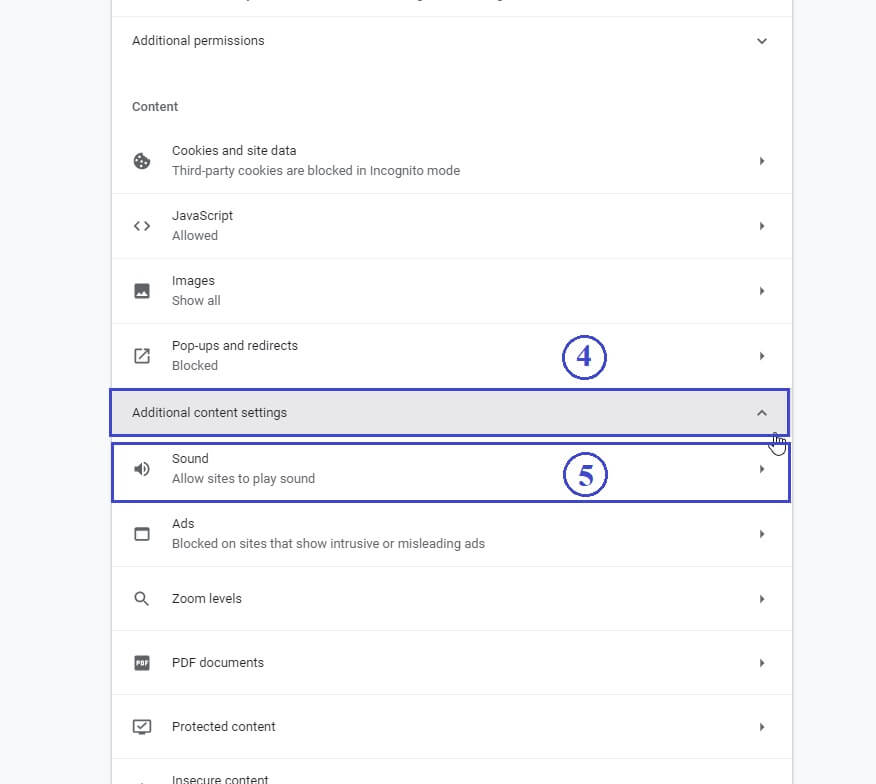
Click on the 4Additional content settings to open more choices. Then, click on the 5sound tab.
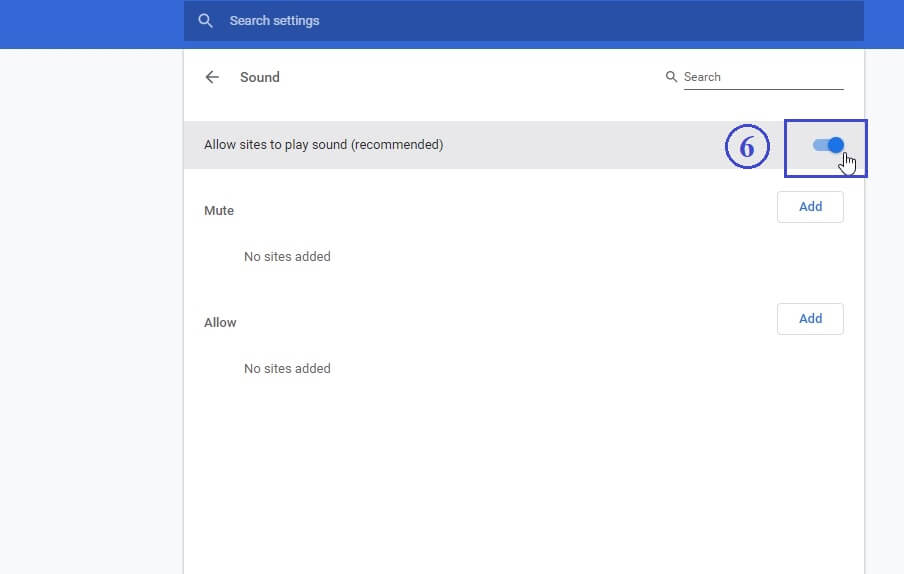
Turn on the 6switch for Allow sites to play sound (recommended) option.
![]() Microsoft Edge
Microsoft Edge
Click on the 1settings icon, then click on the 2Settings menu item.

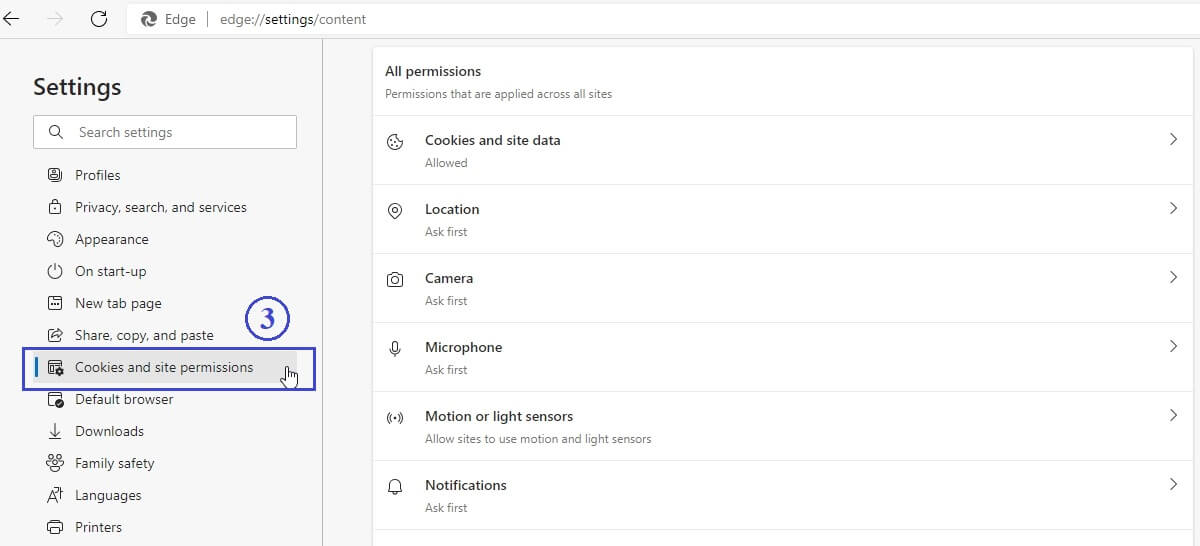
From the left side menu, click on 3Cookies and site permissions.
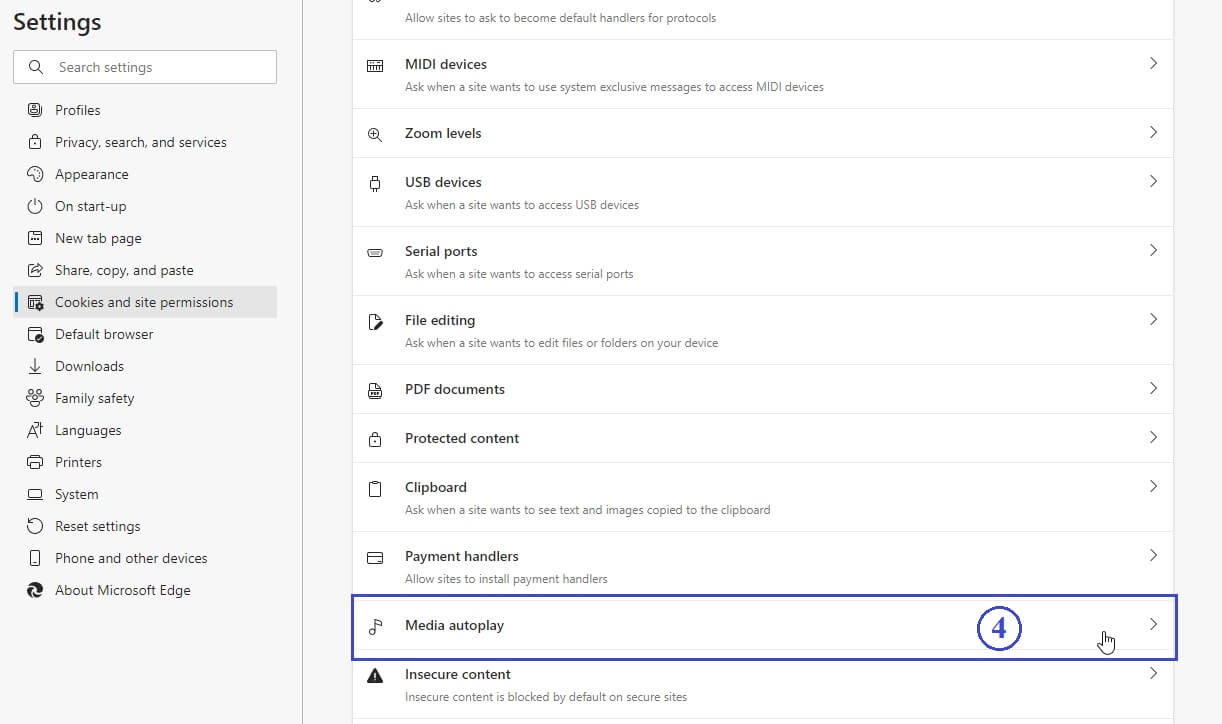
Scroll down to 4Media autoplay and click on it.
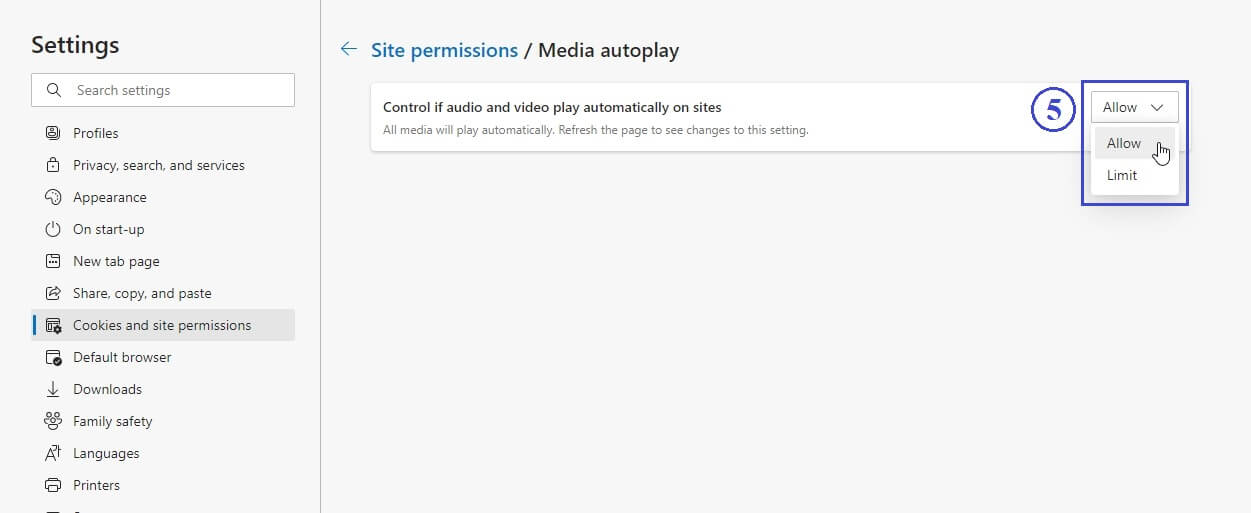
Select 5Allow under "Control if audio and video play automatically on sites" option.
![]() Safari
Safari
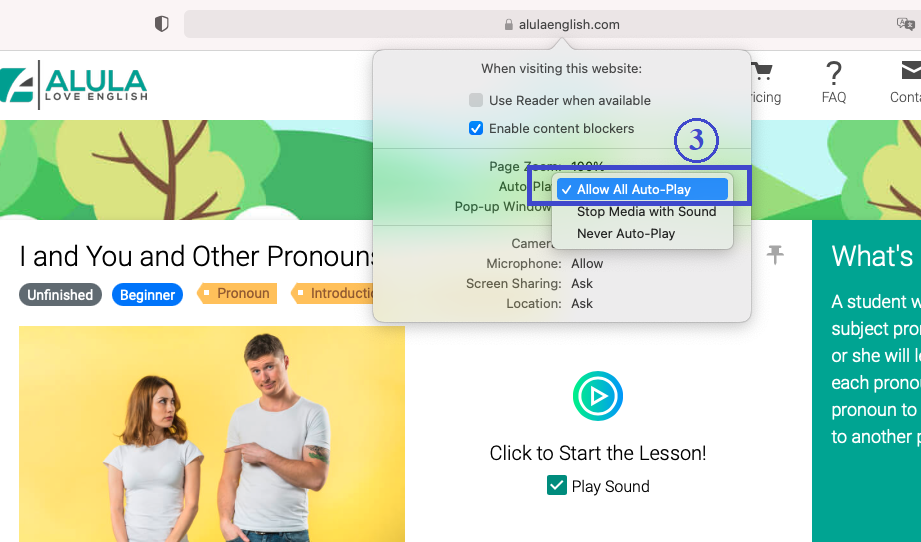
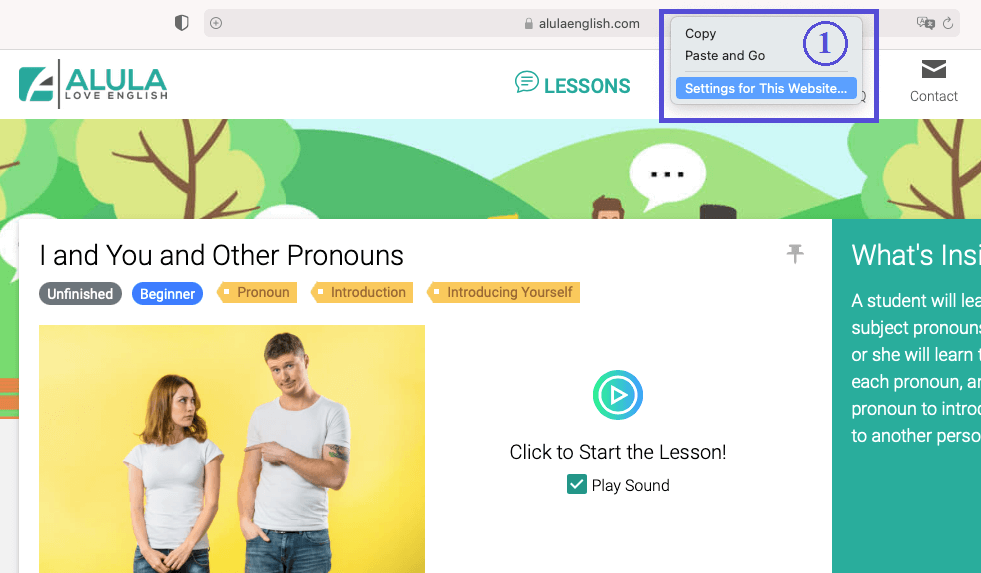
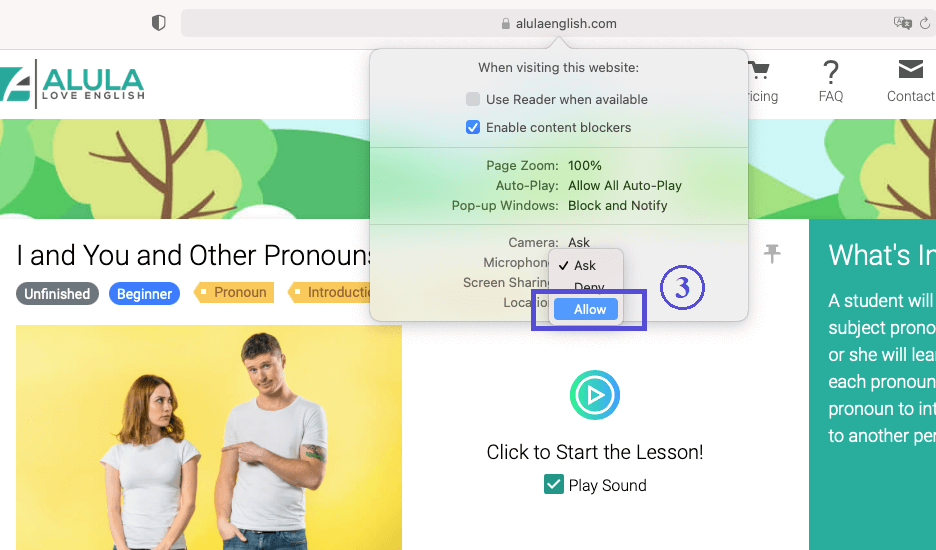
On the browser address bar, control-click, and select 1Settings for This Website...

Click on the menu for 2Auto-Play.
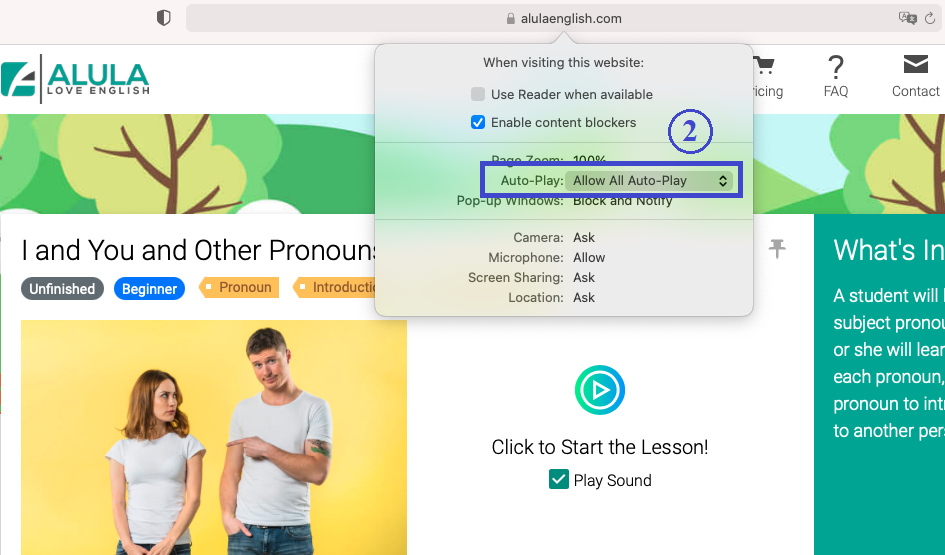
Select 3Allow All Auto-Play.
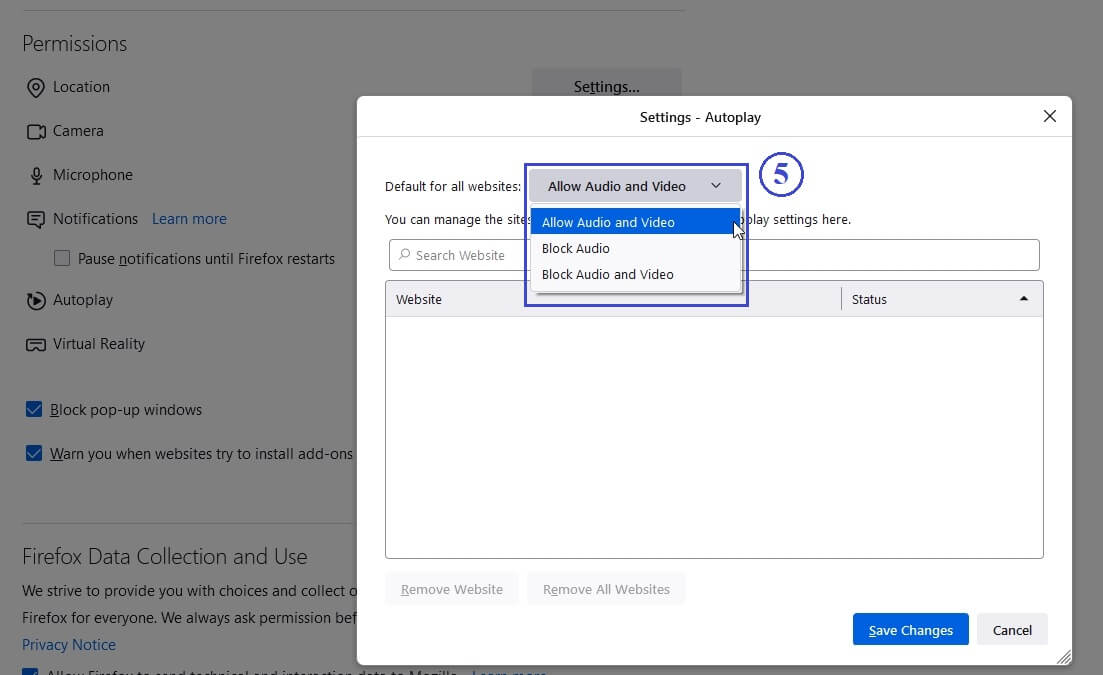
![]() Mozilla Firefox
Mozilla Firefox
Click on the 1settings icon, then click on the 2Settings menu item.
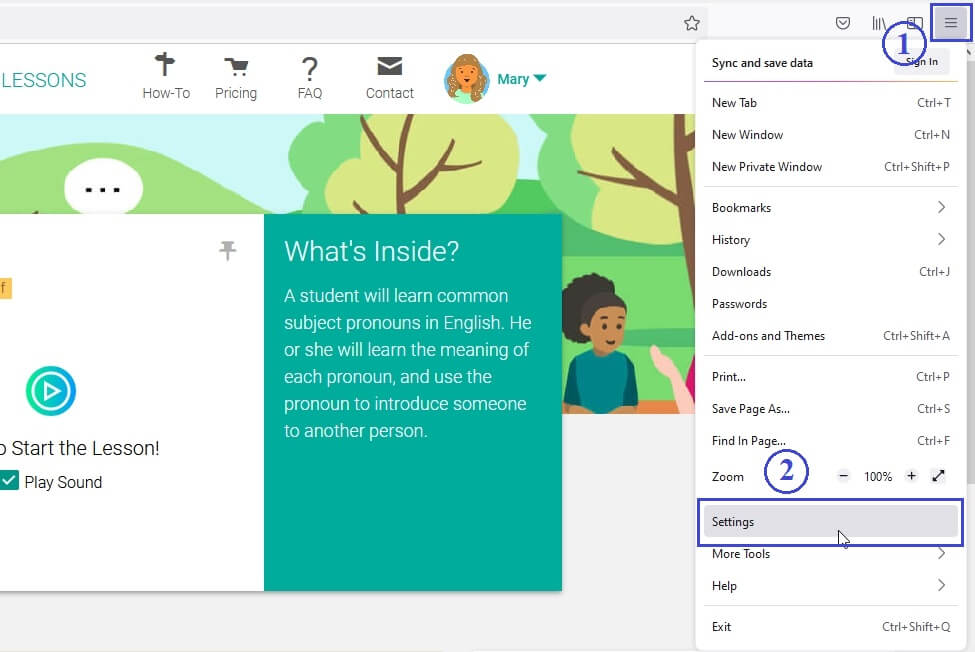
From the left side menu, click on 3Privacy & Security. Then, click on the 4Settings button for Autoplay.
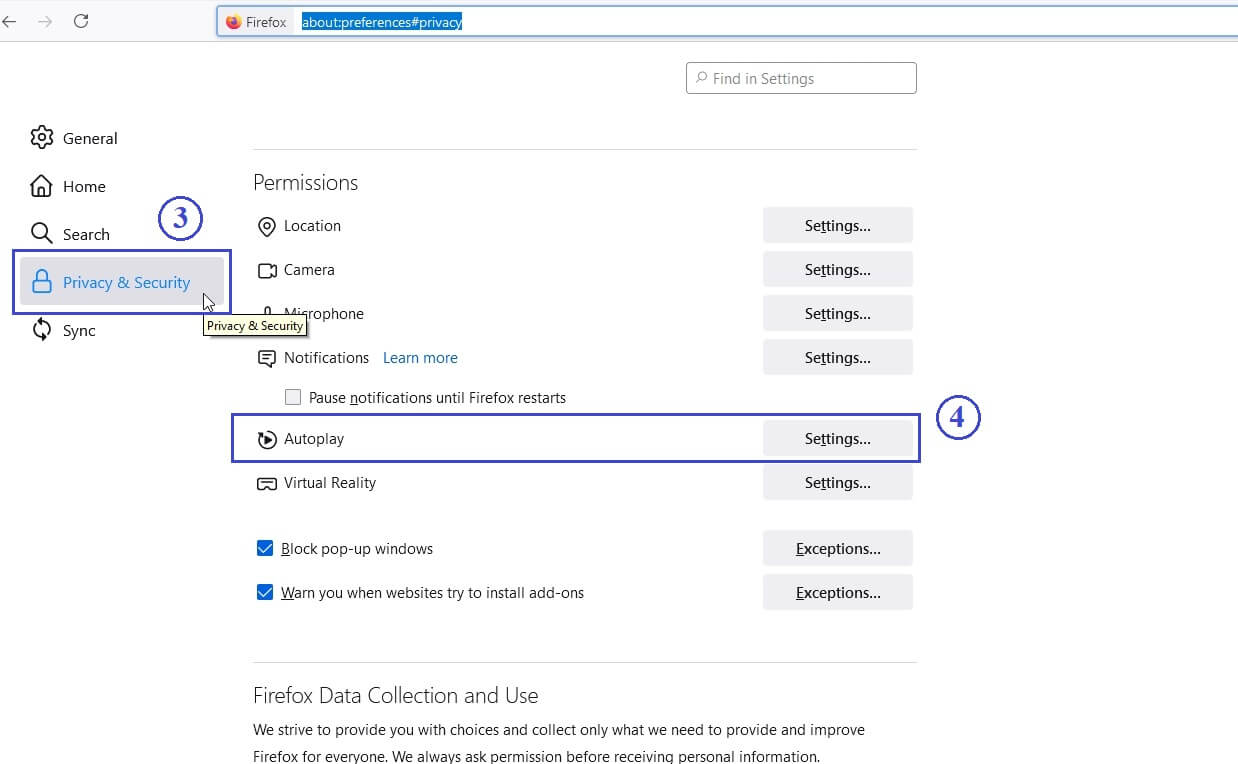
Select 5Allow Audio and Video option.
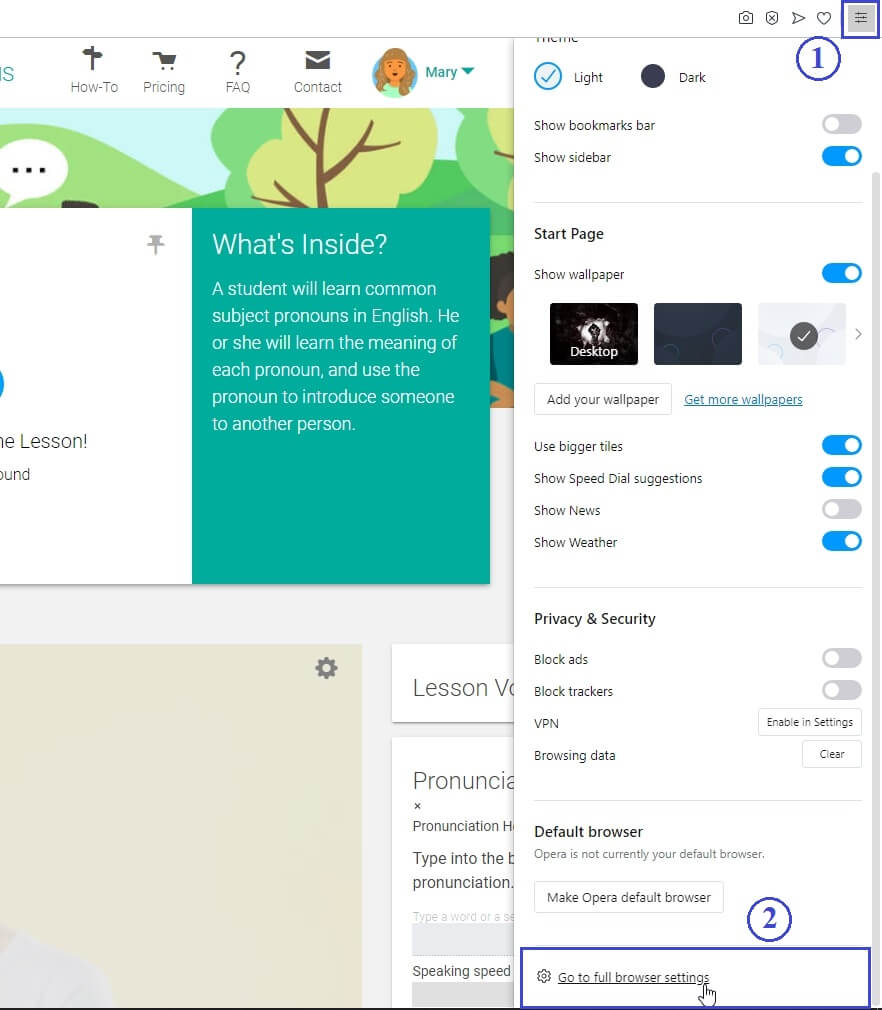
![]() Opera
Opera
Short Method:
Click on the 1green icon on the browser bar. Then, click on the 2Allow option for Sound.
Long Method:
Click on the 1settings icon, then click on the 2Go to full browser setting menu item.
Go to "Privacy and security" section, then click on the 3Site Settings tab.
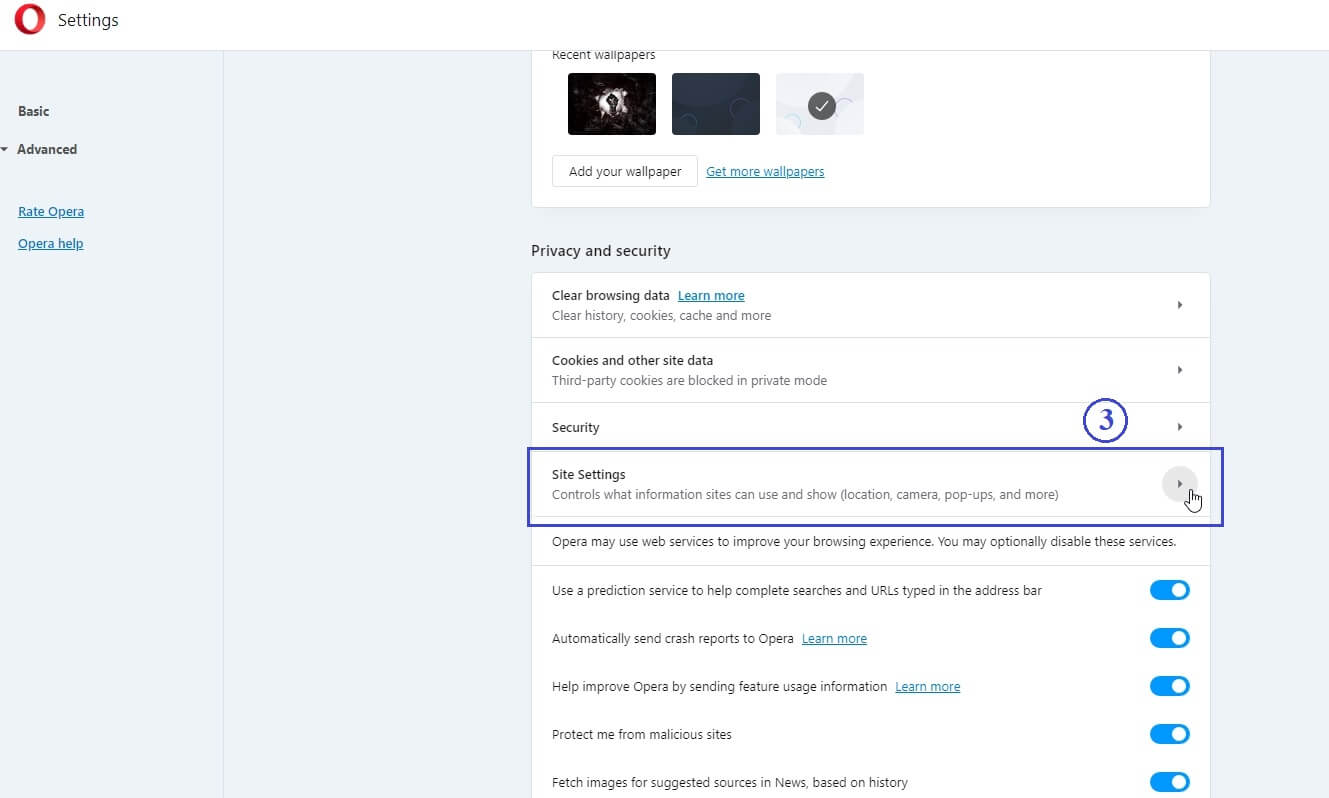
Click on the 4Additional content settings to see more menu items. Then, click on the 5Sound tab.
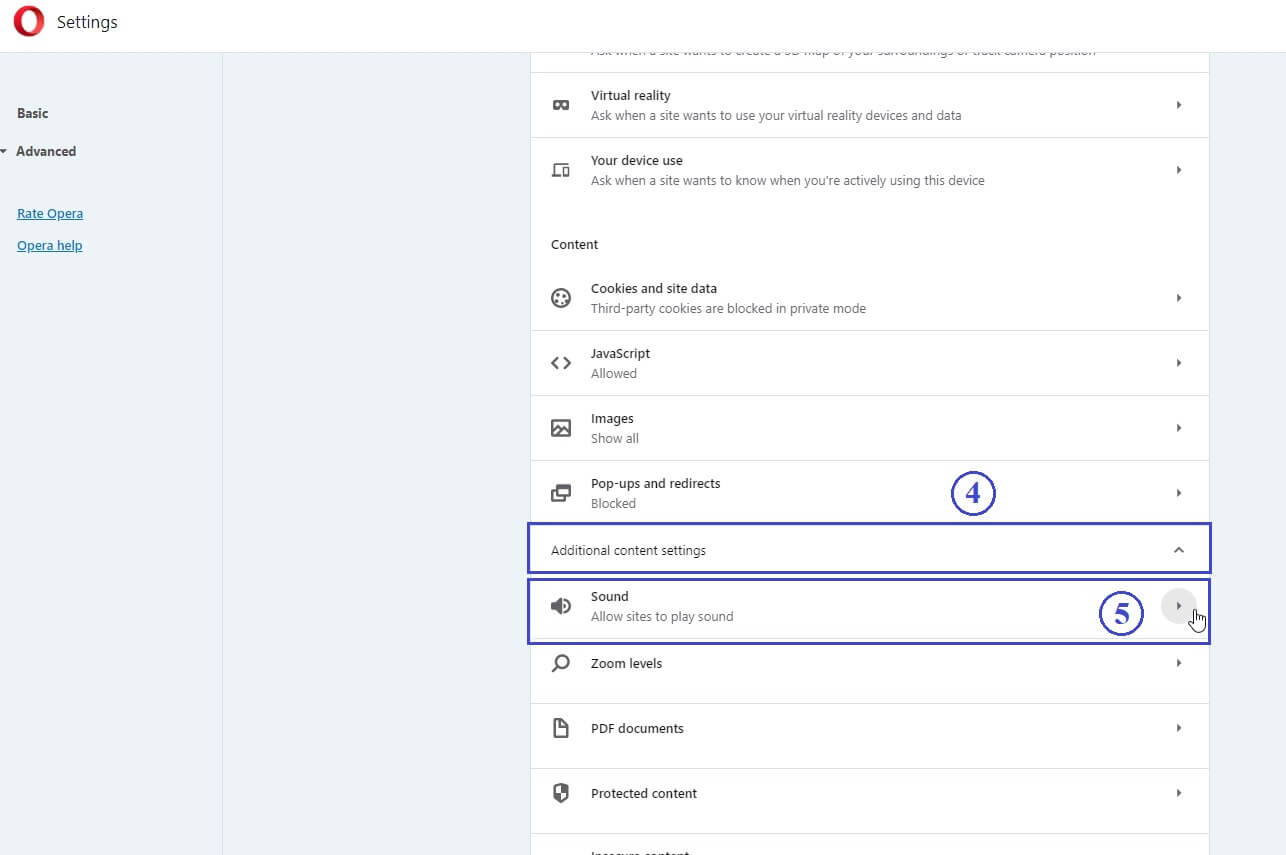
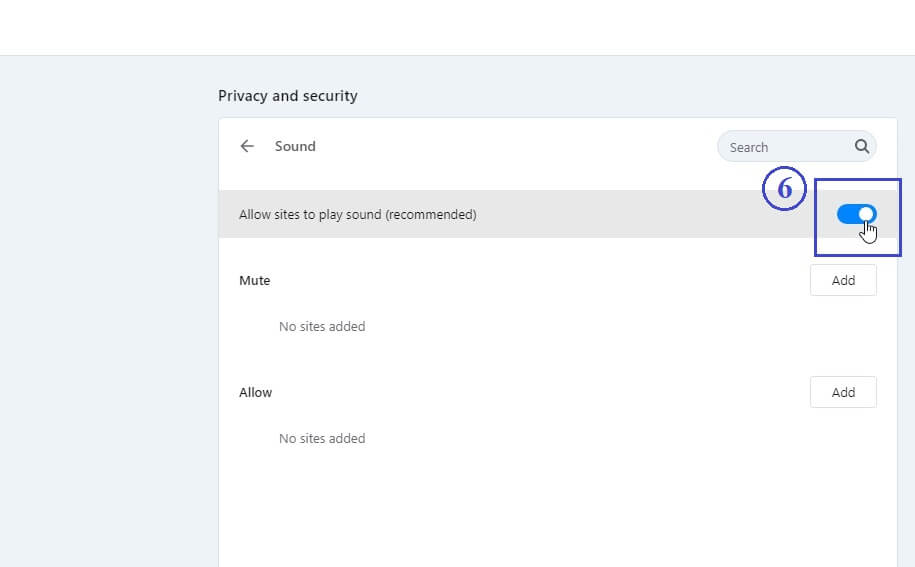
Turn on the 6switch under "Allow sites to play sound (recommended)".
Setting up your microphone
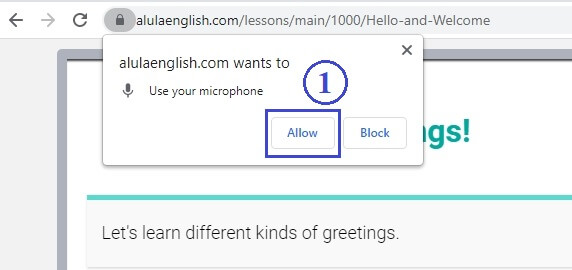
Connect a microphone into your device. A smartphone or a laptop should already have the microphone enabled. When the browser asks for the microphone permission, click on Allow.
If your microphone is enabled, the microphone button will be in Enabled status. If your microphone is not present, not working, or if you have disallowed microphone, the microphone button will be in Disabled status, and you may see an error message.
If your browser does not allow microphones, you can follow the next section to grant permission for microphone.
Unlimited microphone feature is available in the latest version of Google Chrome and Microsoft Edge browsers only. Other browsers are limited to 15 minutes* of microphone feature per account.
- Google Chrome 90 or later
- Microsoft Edge 91 or later
- Android devices - tablet, smartphone (Use your microphone on your device / Use our microphone button)
- iPhone, iPad - recent versions (Use your microphone on your device)
- Firefox (Not Supported)
- Opera (Not Supported)
- Safari on Mac (Not Tested)
- Internet Explorer (Not Supported)
Download Google Chrome. Download Microsoft Edge.
* Usage time for the microphone feature is rounded up to the nearest increment of 15 seconds.
Allowing microphone for your browser
First, please make sure your microphone is plugged in and working. Then, check to see if you allowed your browser to access the microphone.
![]() Google Chrome
Google Chrome
If the browser asks you to grant permission:
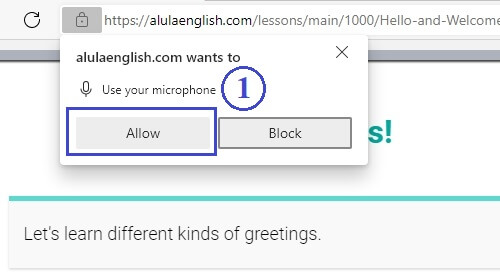
Click on the 1Allow button when the browser asks you to grant permission for your microphone.
If you already blocked your microphone:
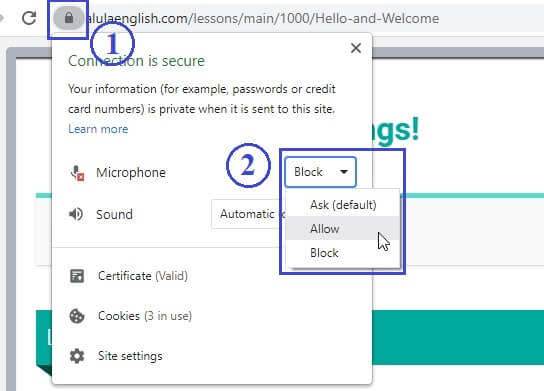
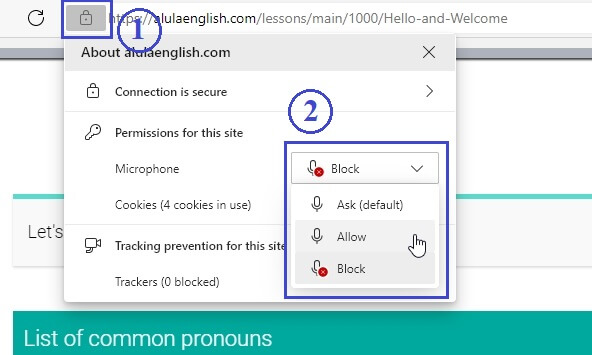
Click on the 1green lock icon on your browser bar. Then, select 2Allow in the dropdown menu for Microphone.
Long method:
Click on the 1setting icon on the browser bar. Then, click on the 2Settings menu.

Click on the 3Site Settings menu under Privacy and security.
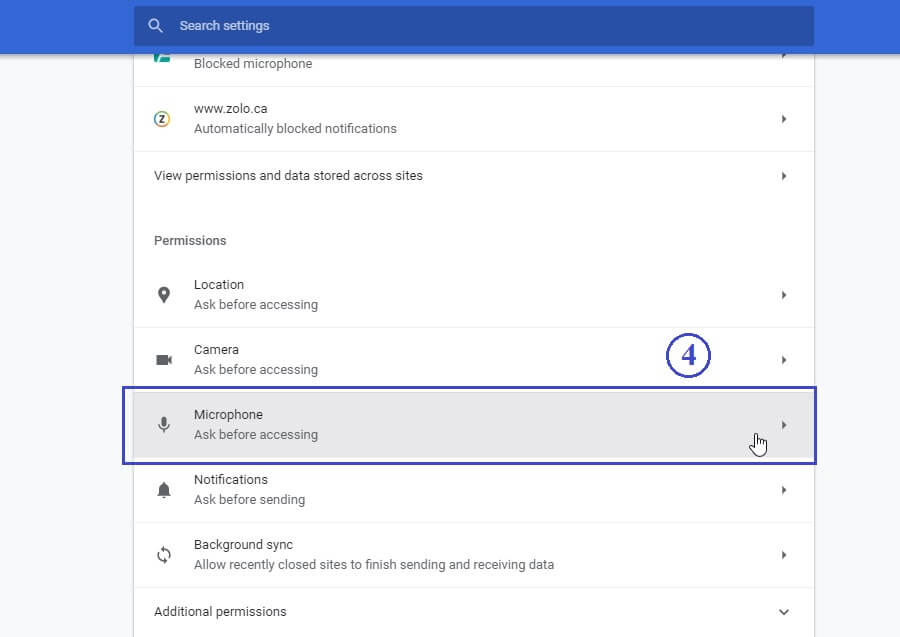
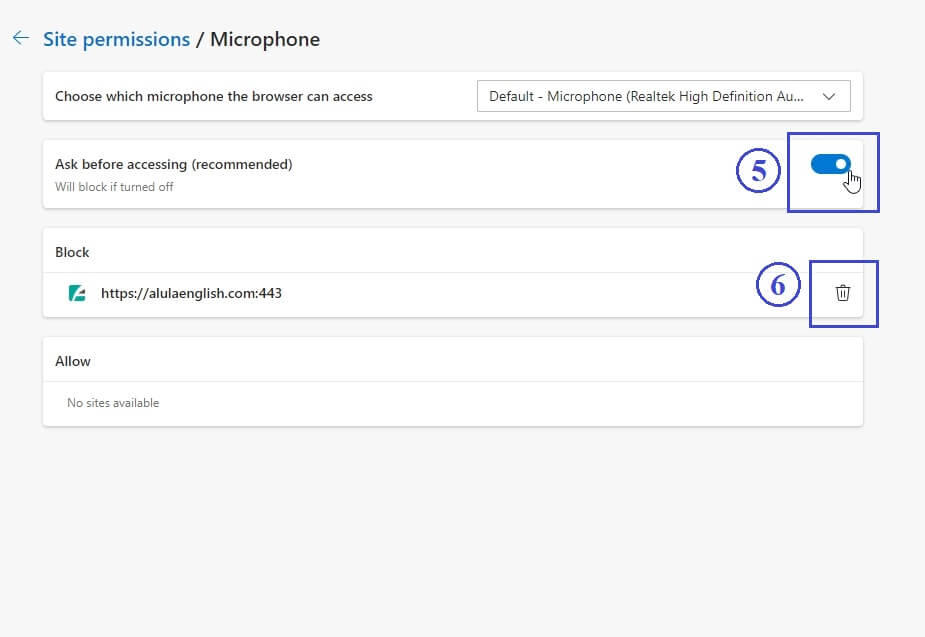
Click on the 4Microphone under Permissions.
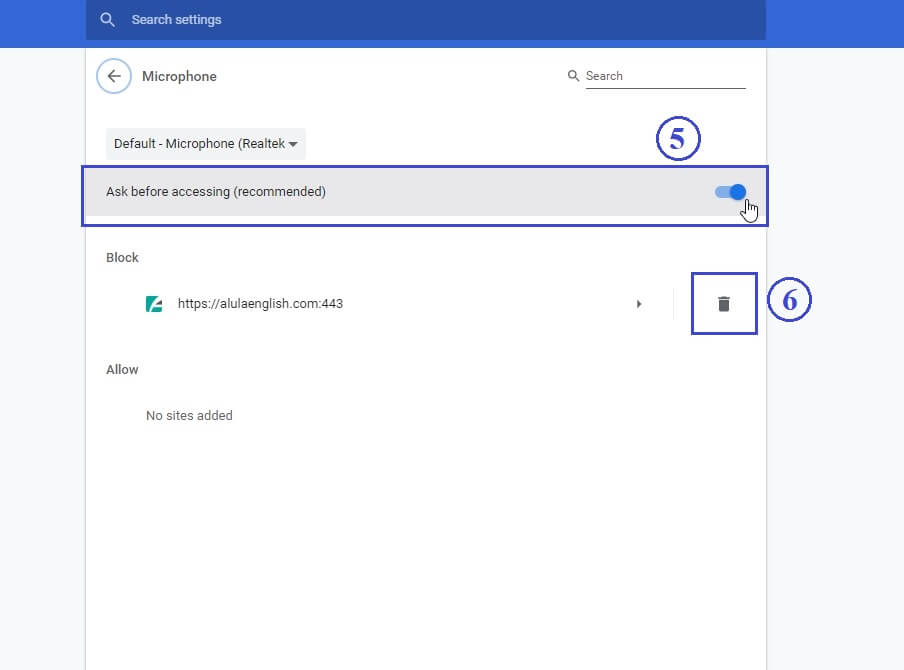
Turn on the 5switch for "Ask before accessing (recommended)". If alulaenglish.com is in the Block list, click on the 6trash icon to remove the site from the Block list.
![]() Microsoft Edge
Microsoft Edge
If the browser asks you to grant permission:
Click on the 1Allow button when the browser asks you to grant permission for your microphone.
If you already blocked your microphone:
Click on the 1green lock icon on your browser bar. Then, select 2Allow in the dropdown menu for Microphone.
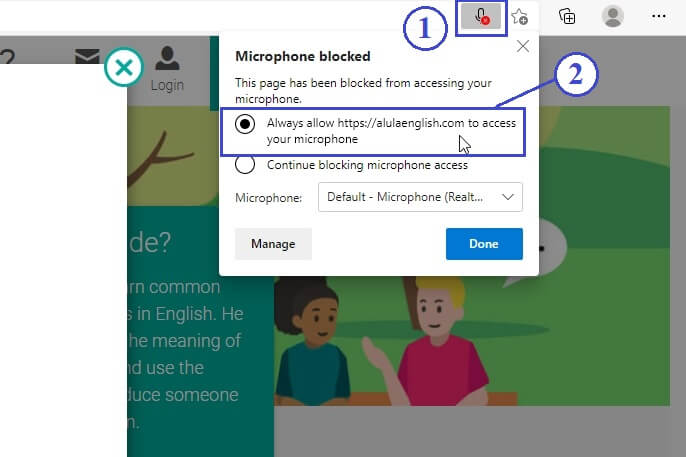
Sometimes, the banned microphone icon is on the right side. Click on the 1microphone icon at the right side. Then, select 2Always allow https://alulaenglish.com to access your microphone.
Long method:
Click on the 1settings icon, then click on the 2Settings menu item.
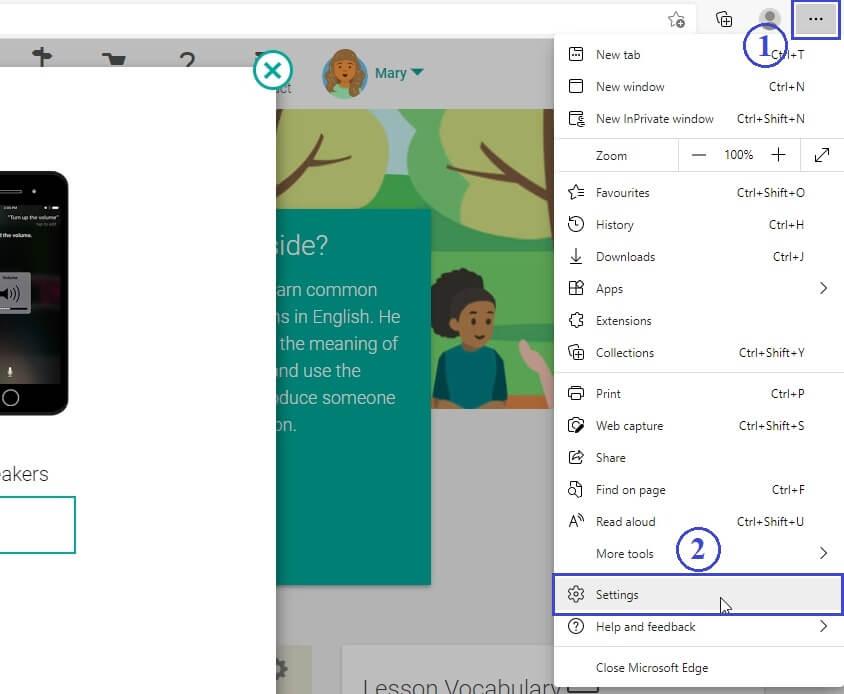
From the left side menu, click on 3Cookies and site permissions. Then, select the 4Microphone option.
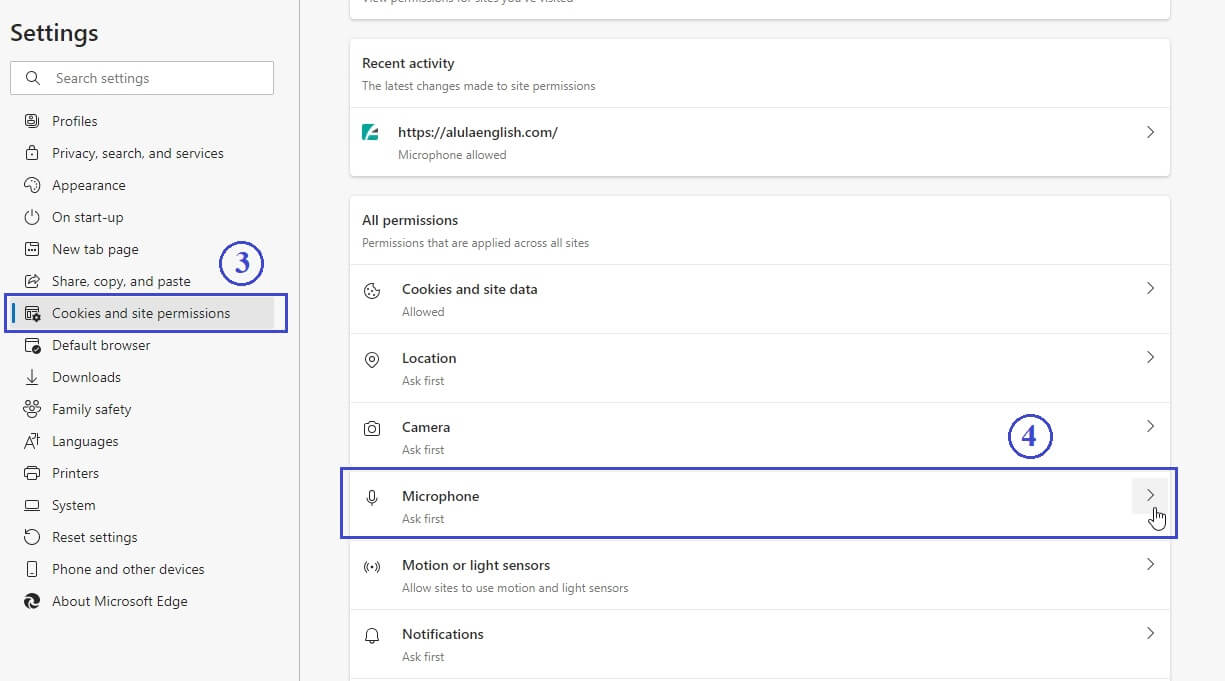
Turn on the 5switch for "Ask before accessing (recommended)". If alulaenglish.com is on the Block list, click the 6Trash icon to remove it from the Block list.
![]() Safari
Safari
On the browser address bar, control-click, and select 1Settings for This Website...
Click on the 2Microphone dropdown.

Select 3Allow.
Speaking to the tutor through your microphone
If your microphone is enabled, you can say the answer aloud.
To say your answer aloud, press down on the green 1microphone button and speak into your microphone. After speaking, release the button. Your speech will appear in the 2answer area. You can click on 3SAY IT button to send your answer to the tutor. Or, press down on the 1microphone button to say it again.
Unlimited microphone feature is available in Google Chrome and Microsoft Edge browsers. On Android devices, iPhone, and iPad, you can use the microphone on your device without limit. For all other browsers, students can use the microphone feature up to 15 minutes* per account.
* Usage time for the microphone feature is rounded up to the nearest increment of 15 seconds.
![]() iPhone, iPad
iPhone, iPad
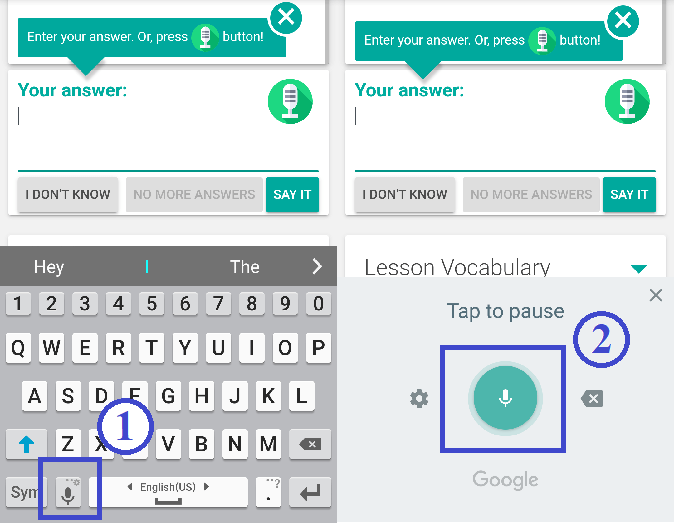
Click on the 1Microphone Button on your device keyboard.
2Speak directly to your device. Your device will convert your speech to text.
![]() Android devices
Android devices
Click on the answer area and the Android keyboard will show up. Click the 1Microphone button. Then, use the 2Android voice recorder to record your voice. The text will show up on the answer area after recording.
Adjusting the speaking volume and speed
You can turn on or off the sound in the settings panel. Click on the 1Settings Icon and toggle the 2Play Sound setting. Also, you can adjust the speed of the tutor's speech by clicking 3Normal Speaking Speed or 4Slow Speaking Speed.
Listening without text
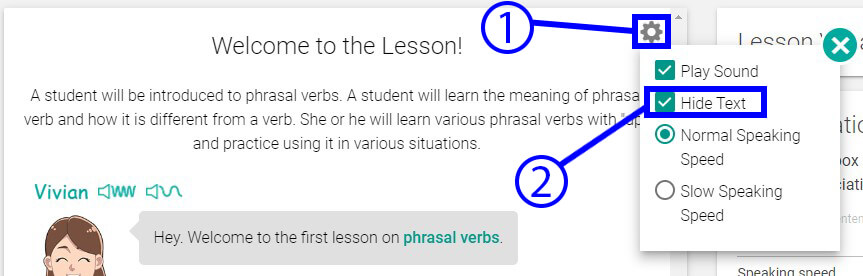
You can hide the text in the tutor's dialogue box to practice listening. Click on the 1Settings Icon and check the 2Hide Text option to hide the text.
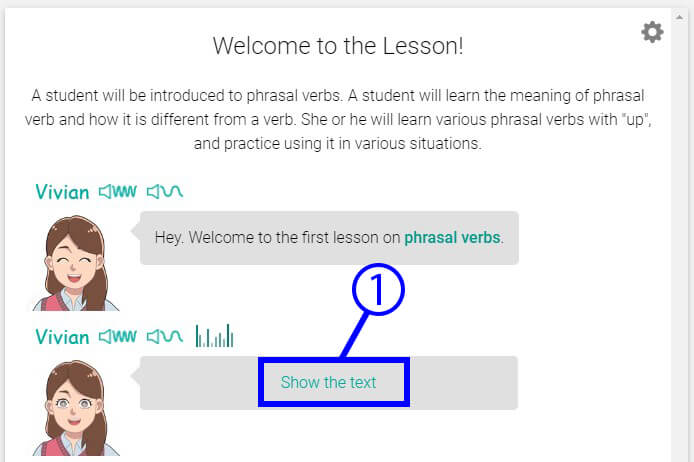
After turning on the Hide Text Option, all tutor dialogues will have hidden text. To show the text, click on 1Show the text button to see what the tutor said.
To always show the text, turn off the Hide Text setting in the Settings Panel.
Listening without sound (Silent Mode)
You can take the lesson without any sound.
Before the lesson starts, uncheck the 1Play Sound checkbox.
Or, click on the 1Settings Icon. Then, uncheck the 2Play Sound checkbox.
Using the pronunciation helper
You can check your pronunciation by using the 1pronunciation helper. Type in the word or sentence you want to check into the 2text box. Then, click the 4CHECK PRONUNCIATION button. The text will be read aloud for you. You can also adjust the speaking speed by changing the 3Speaking speed setting.
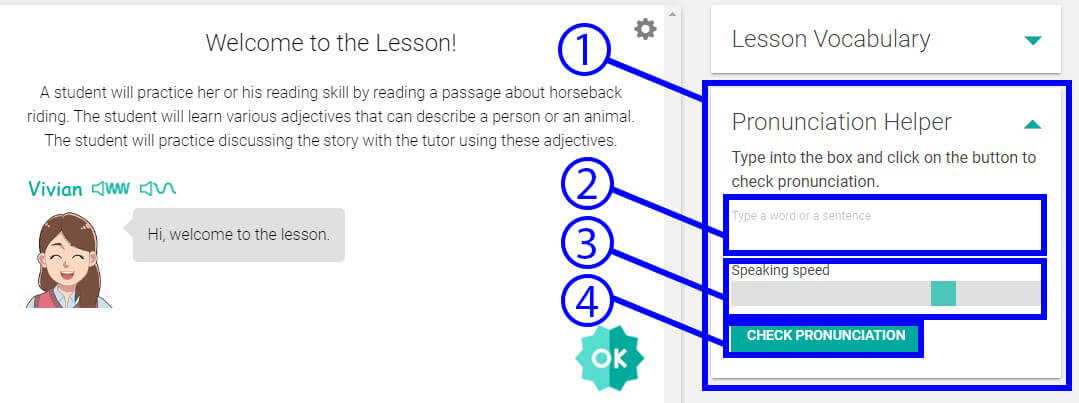
If you don't hear anything, check that your speaker is turned on and your computer volume is not 0.